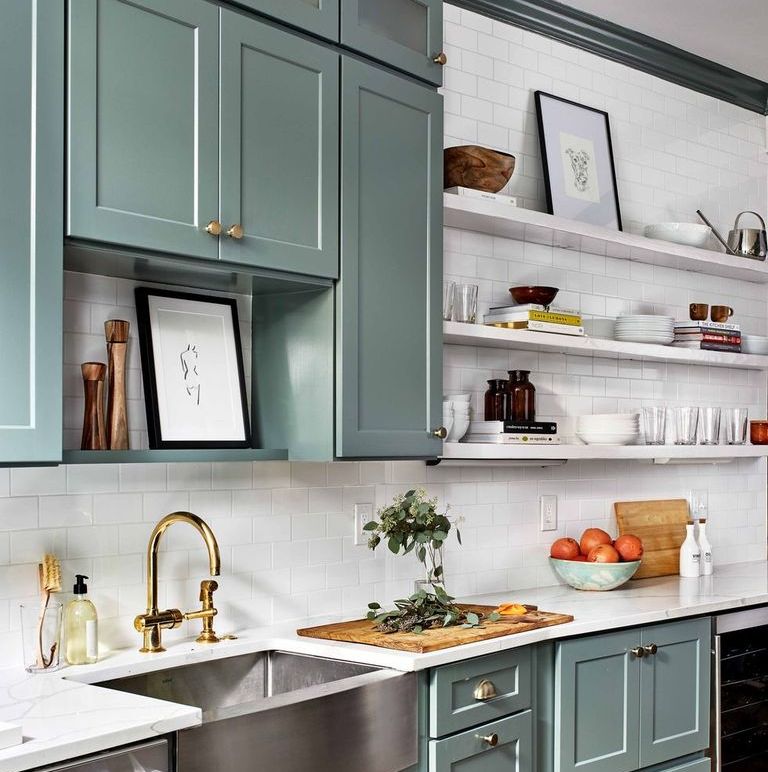
How to paint kitchen cabinets like a pro
-
 Loading...
 - Diego Blanco
- 01 Aug 2022
- 92 Views
- 0 Like
- 0 Comment
If contemporary pop culture is any indication, we are currently obsessed with the home makeover. From shows like Queer Eye to Flip or Flop to The Home Edit, there’s something about that dramatic reveal of a renovated fixer-upper that has us at the edge of our to-be-reupholstered seats. We eat it up—on repeat (of course we’re still watching, Netflix). But there’s always one project that satisfies the collective desire for transformation above all others: freshly painted kitchen cabinets. “By painting cabinets, you are immediately creating a change that is noticeable without having to make a major investment in both time and money,” says Queer Eye star and design expert Bobby Berk. “And when you opt for a totally new color or one that creates more contrast, it just has this huge impact on how the room looks and feels.”
If you’re ready to go beyond reality television and go all Bobby Berk in your culinary space, here are some tips and tricks on how to paint kitchen cabinets like an expert, compliments of the pros.
STEP 1: CONSIDER COST AND TIME

We’re not going to sugarcoat it: Tackling a kitchen cabinet paint job is not exactly something you can finish by noon on a Saturday. But tackling the project yourself does pay off—literally. A professional paint job can easily top $6,000 for an average kitchen, while doing it yourself can come in as low as $200 for paint and supplies. As for project length, a full kitchen takes six to seven days, so plan on a few nights of eating out.
“Anybody can do it,” says Renae Brabham, half of the husband-wife duo behind Brabhams Cabinet Painting—together they’ve completed more than 500 kitchen cabinet jobs. “However, if you try to cut corners, then you’ll end up calling professionals to step in. We’ve gotten so many of those calls, and it almost always boils down to someone getting impatient or using bad products.” In other words, if you’re gonna do it, do it right. Now let’s get into it.
STEP 2: EXAMINE YOUR CABINETS

Rule number one: Before you break out the roller, take a look at the condition of what you’re working with.“Any small chips or cracks to the doors can also easily be repaired with a wood filler,” Berk says. But keep in mind, not all cabinet doors and drawers are paint-worthy. If the veneer is peeling or the woodwork is warped, you might be better off buying new unfinished drawer fronts and doors to replace the beat-up ones.
Cabinet material is also an important consideration. Wood, wood laminate, veneer, fiberboard, and even metal cabinets can be repainted without difficulty. However, plastic laminate and thermofoil cabinets might require special paints and techniques that will be more conducive to paint adhesion. If in doubt, test a sample of the paint in an inconspicuous area or even remove a door and bring it into a paint store for inspection.
STEP 3: PREP THE SPACE

We know, you’re eager to put brush to paint. But a little upfront prep ensures that your countertops and backsplash don’t get an unanticipated paint job of their own. Empty the cabinets, clear the counters, and move furniture that’s in the way, so you have plenty of work space. Give the room a thorough dusting to prevent particles such as pollen from settling on the wet paint. Next, cover the backsplash, counters, and floor with brown builder’s paper or plastic tarps.
Brabhams recommends preparing a work area outside of the kitchen—such as a garage or basement room—with good ventilation and even a few fans. There, you will lay down plastic and set up three to four sawhorses with two-by-fours on top to hold the cabinet doors. You can also set up a nearby paint station, complete with paint, rollers, brushes, buckets, and sandpaper.
When it comes to big paint jobs, don’t forget to take safety precautions to avoid unwanted exposure to paint vapors. Keep windows and doors open, use fans to keep the air moving, and continue ventilating the area for at least three days after painting. Take breaks while painting as well.
STEP 4: REMOVE THE DOORS AND HARDWARE

Yes, it’s a major time suck. And yes, you will be tempted to go rogue and skip this step. But removing the cabinet doors gives you access to all surfaces of the cabinet. So unless you are going for a bolder free-form flair, don’t cut this corner and do remove that door. Starting at one end of the kitchen (working clockwise or counterclockwise) use a drill or manual screwdriver to remove the cabinet hinges, doors, drawers, and hardware. If you’re painting only the door fronts, you do not need to remove the sides.
“Number the doors as you take them off,” Brabham advises. “Otherwise, it will be a mess because not all doors are created equal.” She suggests writing the number in the hole where the hardware was, and covering it up with a piece of tape to avoid painting over it. To avoid losing the hardware for each door, Brabham puts it on the shelf each door came on or placing each in a small bag that is labeled with the corresponding cabinet number. Read More...