What is Color Banding in Photography? (And How to Fix It!)
-
 Loading...
 - victoria Spencer
- 14 Jun 2022
- 262 Views
- 0 Like
- 0 Comment
Color banding in photos is distracting discolorations—colors that should gradually move from one shade to the next instead jump to the next color. You see distinct bands or rows of color instead of a gradual transition. The bands may be roughly straight or curve around objects.
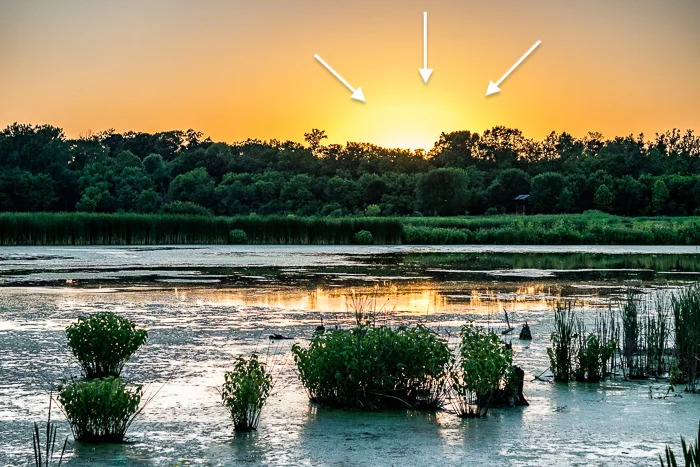
You are more likely to see banding in areas of your image where one hue dominates, like in a cloudless blue sky. Instead of moving seamlessly from one shade of blue to the next, you see distinct lighter and darker blues sections. Or you may see sections of color in areas with a high dynamic range, like when shooting into the sun. The exposure and colors jump, and you may see a yellow, orange, or red halo.
You might not notice color banding at first. You may only see it after editing or exporting the file as a JPEG. So let’s explore what causes colors to separate. Once you understand the cause, we will show you how to avoid banding and fix it in post-processing.
What is Color Banding?
We see banding as a problem with color. But it is really a problem with tones moving from light to dark. We only see it when the same color transitions from light to dark. When you purposefully encourage color banding in your photo, it is called posterization. It is a style popular when creating posters, thus the name.
What Causes Banding in a Clear Blue Sky?
Often banding appears in a clear blue sky. But it may be hard to pin down. You might see it immediately after taking the photo or not until you have uploaded the picture to social media. One image may have banding, but the next one may not.
There is one underlying cause of color banding. There is not enough tonal range in the photo to create a gradual transition. Some of the reasons for banding can get a bit technical. But let’s try to keep the explanations as simple as possible.

Color Banding in a Compressed File
You are more likely to see banding in a compressed file. The most common type of compressed file is a JPEG. You usually compress your files to JPEGs before posting them to social media. But many cameras let you choose different compression levels when taking a photo. These settings range from compressed JPEG to uncompressed RAW files.
When compressing a file, digital information is removed. It is usually information the camera or photo editing program thinks you do not need. Color separation occurs when too much tonal information is removed. Blank blue skies seem like they are all one color. But there are often slight color variations. The technology may get over-aggressive and remove some of the blue information, thinking it is unnecessary.
Compare these two images compressed as JPEG files. The one on the right was compressed with 100% quality, the other only 10%.
Color Banding During Photo Editing
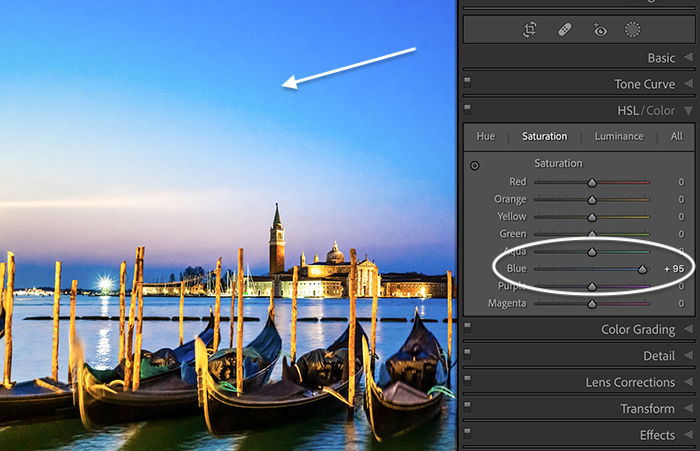
Sometimes you create banding problems during photo editing when you push color settings to an extreme. For instance, you may want to bring out the color of the sky or correct for exposure. Banding can happen if you add too much saturation, vibrance, or dehaze. It can also occur if you adjust single colors in the HSL/Color panel.
When banding occurs during photo editing, you have pushed the tonal range too far. There is not enough information in the file. There are a few photo-editing tricks to help with this. But in general, you may not be able to push the photo edits as far as you want to.
How to Avoid Color Banding
Ideally, you want to avoid tones separating in the first place. There are a couple of things you can do when taking photos to eliminate or reduce the occurrence of banding.
Shoot and Edit Uncompressed Files
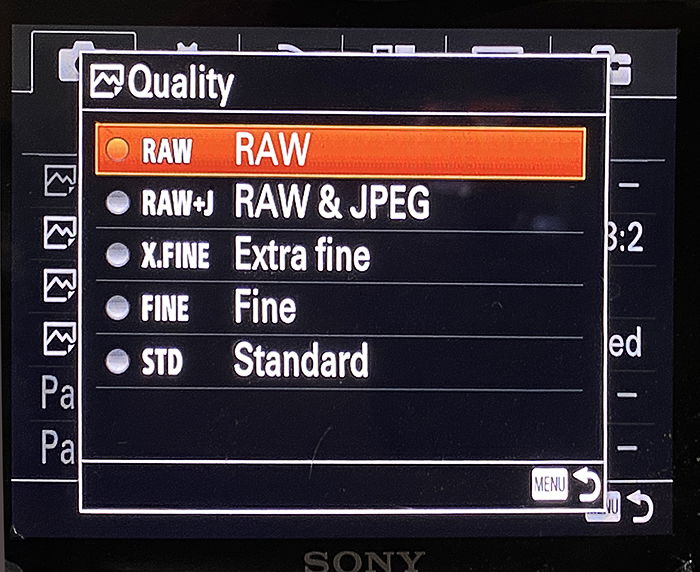
There is a reason why most professional photographers shoot photos in an uncompressed RAW format. Uncompressed RAW files are larger than JPEG or compressed RAW files. That is because RAW files keep all the digital information your camera is capable of capturing. You lose data when the camera compresses the RAW file or converts it to JPEG.
If you are having problems with banding, check your camera settings. Most mid-to-high-end cameras let you choose the file format. If you are shooting JPEG or compressed RAW, switch to uncompressed RAW. That may be all it takes to fix the problem. Even iPhones have a RAW file option.
Then import the highest quality files possible into a photo editing program. And do most of your edits on a RAW file. If you have to export your photo for further editing, use an uncompressed format like TIFF or DNG in 16-bit mode. Lightroom recommends using ProPhoto RGB color space. You can see these settings in the Lightroom Classic > Preference menu under the External Editing tab.