Infrared Photography: How to Get Started (Beginner's Guide)
-
 Loading...
 - Joanna Bailey
- 02 Dec 2021
- 614 Views
- 0 Like
- 0 Comment
In this article, I’m going to share everything you need to know to get started, including:
- IR photography gear (for both beginners and advanced photographers)
- Key camera settings for IR pictures
- Simple post-processing techniques to get your photos looking great
Sound good? Then let’s get started with a simple overview of infrared imaging…
What is infrared photography?
Infrared photography uses infrared light to expose photos, a form of electromagnetic radiation that lies below the visible spectrum. Humans cannot see infrared light, but camera sensors can, and this IR sensitivity can be used to create images.
That said, cameras aren’t well-equipped to capture infrared wavelengths – after all, they’re designed to use visible light, not IR light! – so infrared imaging requires special filters or adjusted camera sensors.
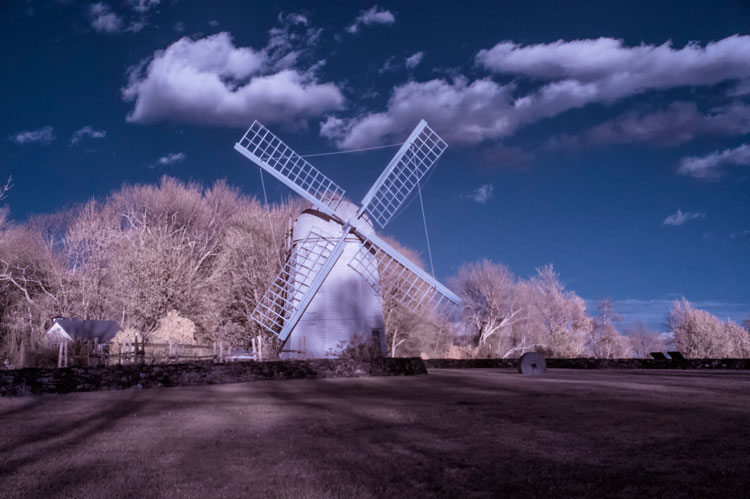
When you capture an infrared photo, the result usually looks like this:

It’s interesting, but not what most photographers are after. However, with a little post-processing, you can achieve a beautiful infrared look:

If you’ve encountered infrared images, you’ll immediately notice that the look stands out – and while some find it rather eerie, others are intrigued by the way the IR look can transform the ordinary.
Infrared photography gear
To shoot infrared photos, you’ll need standard photography equipment – a camera and a lens – but you’ll also need to create the infrared effect, which you can do in one of three ways:
- With an infrared filter
- With a professionally converted infrared camera
- With infrared film
Let’s take a look at each option in turn:
Infrared filters
If you are just starting to explore infrared photography, an IR filter is the cheap and convenient way to go. Simply place it in front of your lens, and it’ll allow infrared light to hit your camera’s sensor while blocking out all visible light. The results can be very nice; here’s an image I shot with an infrared filter:

There are plenty of options out there, ranging from screw-on to slide-in filter systems. The Hoya RM-72 is a popular screw-on infrared filter, and is a great introductory option to the world of infrared.
Note that different filters render color differently, depending on the specific IR and visible light ranges they filter in and out, so the results are inconsistent from filter to filter; this can be frustrating if you want your IR photos to look like everyone else’s, but the silver lining is that you can experiment with different filters until you find one that suits your vision.

Converted infrared camera
If you are truly committed to infrared photography, then you should consider purchasing a dedicated infrared camera body.
As far as I’m aware, no DSLR or mirrorless manufacturers produce infrared cameras, but you can send off a camera body to be converted by third-party companies. Alternatively, you can buy an already-converted IR camera used on eBay or from an IR-conversion dealer.
When a visible-light camera is converted to capture infrared, the infrared-blocking filter (which sits in front of the sensor) is removed. It’s certainly more expensive than purchasing a $75 filter, but the benefits include convenience and consistency.
Note: Once a camera has been converted, its sole use is infrared photography; you cannot take regular images. So buying a dedicated infrared body involves purchasing a second camera body (unless, of course, you want to fully dedicate yourself to infrared!).

Infrared film
Infrared film is readily available and relatively cheap, too – so you might consider purchasing an inexpensive SLR, grabbing some IR film, and testing the infrared waters.
Unfortunately, developing infrared film is tough. For one, not all labs can handle infrared film, and it generally costs more, too, so you’ll need to do a careful cost-benefit analysis before grabbing an infrared film setup.

Infrared camera settings
Selecting the perfect IR camera settings involves a lot of trial and error, and while nothing beats proper experimentation, here are some guidelines to get you started.
RAW and JPEG
When you’re starting out, shoot both RAW and JPEG files. You won’t be capturing thousands of shots, so space shouldn’t be an issue, and RAWs and JPEGs each offer valuable benefits.
On the one hand, RAW files give you the most scope when processing (and infrared photos do require significant edits). A RAW file will let you recover blown out highlights and clipped shadows, which is essential for infrared photography, as the right exposure settings can be tough to nail down (more on that later!).
On the other hand, JPEGs are easily viewable, so you can see the results of your infrared photos on your computer screen without any processing.
It’s important to emphasize, though: Straight-out-of-camera infrared photos look horrible. At first, you’ll probably be turned off by their flat, pink appearance – but over time, you’ll get used to it, and you’ll soon develop the skills to identify a good IR image from a bad IR image at a glance. Read More…