How to Use the Zone System in Photography
-
 Loading...
 - Adam Kelly
- 01 Jun 2022
- 286 Views
- 0 Like
- 0 Comment
Even though the Zone System is over 80 years old, it is still relevant today whether shooting modern films or digital capture. This article is for photographers wanting to learn more about the Zone System for their particular workflow.
We will look at how the Zone System works with a classic film-to-darkroom workflow and a hybrid film-to-digital workflow. If you are strictly a digital photographer, you will find a better understanding of what the Zone System can offer you as well.
What this article is not intended to be is an exhaustive deep dive into any element of a particular workflow. Photography is art and craft, and mastering both takes as much time as it would take to master the art of painting or playing a musical instrument. It is my hope you find something in this article that stirs your interest in discovering what the Zone System can offer your workflow. With all the countless educational resources available today, you will be able to find what I have touched on here in greater detail elsewhere. With that being said, let’s move on.
The Zone System for Today’s Digital Photographer
The Origins of the Zone System
The Zone System was developed during a time when black and white sheet film was the standard in commercial and amateur photography. Ansel Adams and Fred Archer developed the Zone System while teaching at the Art Center School in Los Angeles in 1939 and 1940. The Zone System is based on the 19th-century sensitometry studies of Hurter and Driffield, photographic scientists who brought measurable scientific practice to photography.
Why Use the Zone System
If you want to improve the art and craft of your photography, the Zone System can help you. It was developed to help photographers capture the largest tonal scale they choose to have for their black and white photographs. Initially, it was created to work with film that was not as technically advanced as modern film, but at the core of its technique is a method that can help all photographers regardless of their chosen platform.
Note: When citing film during this article, I will be referring to black and white film.
Using the Zone System for Film and Hybrid
We will look at typical workflows for film and hybrid platforms, and I will touch on each individual step.
A Typical Classic Film and Darkroom Workflow
- Pre-visualization
- Metering
- Shooting
- Film development
- Darkroom skills and printmaking
A Typical Hybrid Film and Digital Workflow
- Pre-visualization
- Metering
- Shooting
- Film development
Digitizing film and post-processing
#1: Pre-visualization
Pre-visualization is a big word for imagining what you would like your photograph to look like before you make it. How can we design a photograph in our mind that is visually appealing? Just like an athlete practices their sport, so do visual artists. Learn how to play the game!
The best way I found to practice for the game is to look at visual art. Study art that appeals to you. When I say study, I mean look at it and try to figure out why it grabs your attention. Look at the light, the elements, the color, the theme, etc.
Ask yourself, “why did the artist choose to include these particular elements?” Maybe they chose them because they help tell a deeper story. Look at the direction of the light if it stirs your emotions. What about the color? Does it appear graphic in nature? Or maybe it is part of a larger pattern. After you study enough art, you will start to understand what makes an image, art.
With enough appealing art feeding into your brain, you can develop a database of visual ideas to pull from. Take the time to expand your visual intelligence so you don’t wander around aimlessly with a camera. Make a photograph instead of taking a photograph. How do you know if you are using your visual memory? Your images will improve over time as your visual cortex subliminally guides you. This is the only way I know how to explain what drives visual creativity. Feed your visual database with art and photographs you enjoy looking at.
#2: Metering
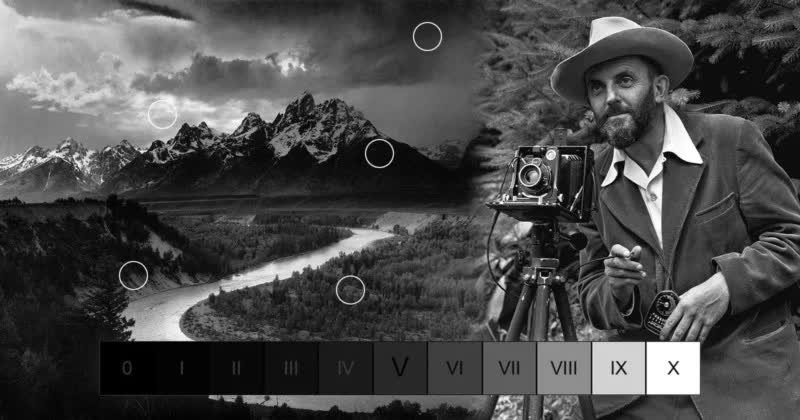
A simple explanation for the Zone System is metering for the shadows and developing for the highlights. The zone step chart below shows the zone values with Roman numerals. Each step equals ‘one stop’ of light change. We will reference these values when metering during the pre-visualization step. I have a zone sticker on my meter that I use for quick reference, and recommend something similar when metering for zone values.
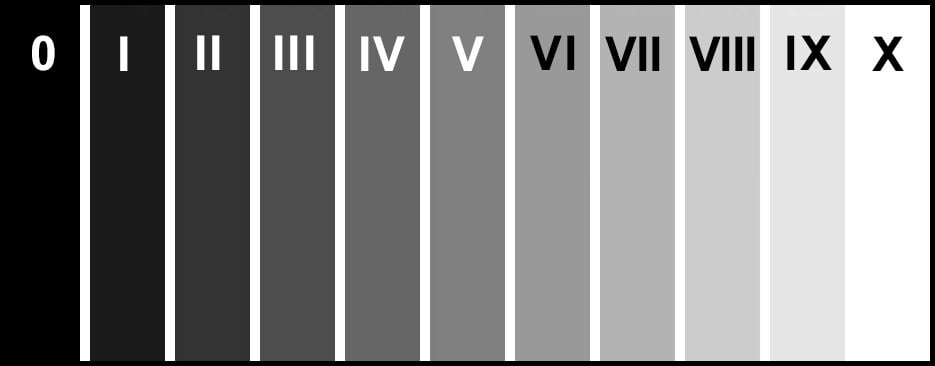
The zone values III, V, and VII are the deciding zones I concern myself with the most. Zone III is where the darkest tone with detail is. Zone V is middle grey (think Kodak’s 18% grey card). Zone VII is where the lightest tone with texture is. Zone II is almost black and Zone VIII is almost paper white. I treat zones outside of III through VII as accent tones and do not expect detail from them. For example, specular highlights should fall into Zones IX and X.

An infographic of the Zone System by Esmer Olvera and licensed under CC BY-ND 2.0.
Below is an example where I metered for the shadows and developed for the highlights.

When I metered for this photograph, I took various readings around the composition and decided the most important detail for Zones III and VII was in the circled areas. The next step is to put the meter readings into shooting success! Read More...