PhotoPills: A Photographer's Guide
-
 Loading...
 - Ella Murph
- 01 Jun 2022
- 296 Views
- 0 Like
- 0 Comment
PhotoPills is a planning tool to help you create images of the Sun, Moon, stars, meteors, and more. It can help you decide the best place to focus for maximum depth of field and calculate the correct exposure when using a neutral density filter to blur water, clouds, and other subjects. What’s more, you can use it from anywhere in the world with an Internet connection to plan a photo shoot anywhere else in the world.
In fact, PhotoPills (available for both iOS and Android) is so packed full of features that it can be a little overwhelming. I like to take a practical approach to photography – focus on what’s important and don’t worry too much about the other stuff. It’s the same with using PhotoPills. It has a lot of great features, but you don’t need to know them all in detail to get started planning and making amazing images.
In this article, I’m focusing on the key features to get you started. Once you get some experience with those you’ll be able to dive into the rest on your own. The article is split into three parts:
I. Getting Started. This covers a quick setup and basic navigation through PhotoPills.
II. How to Plan Photographs with PhotoPills. This section is for people who want to jump right in and get started and learn how to do some of the cool things you can do with PhotoPills. It takes you step-by-step through the planning process for some of the most popular types of photos, including Milky Way, Sun/Moon, meteor shower, star trails, and more.
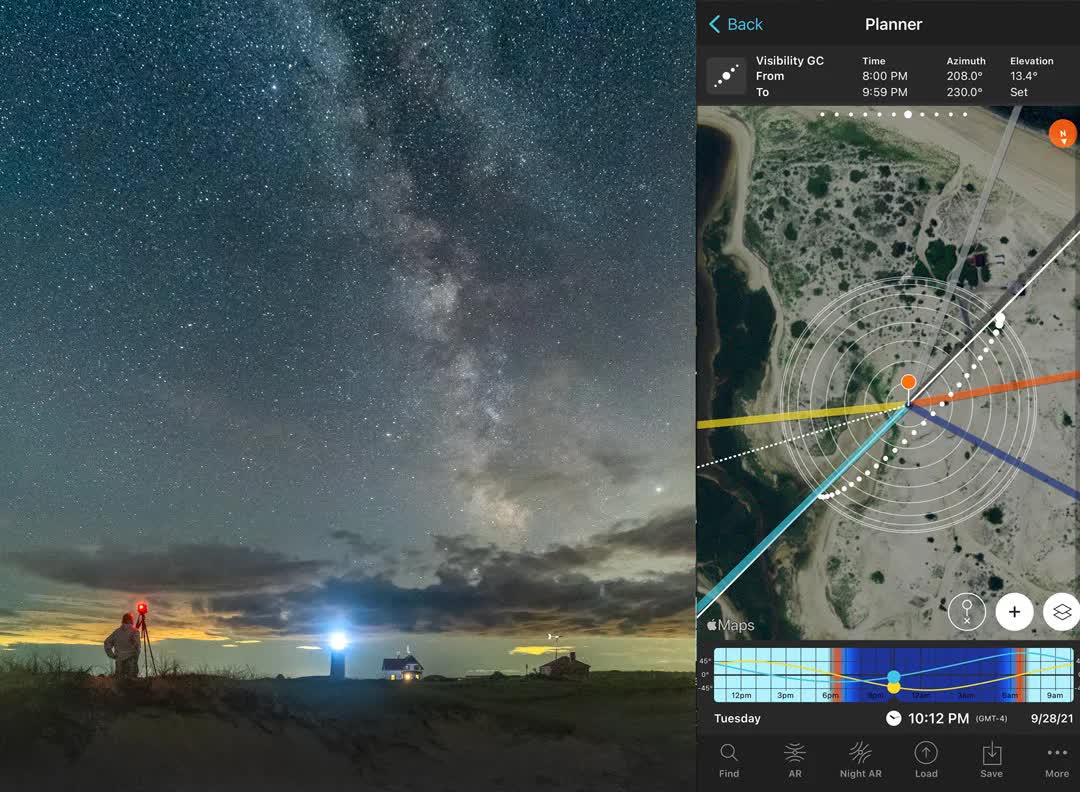
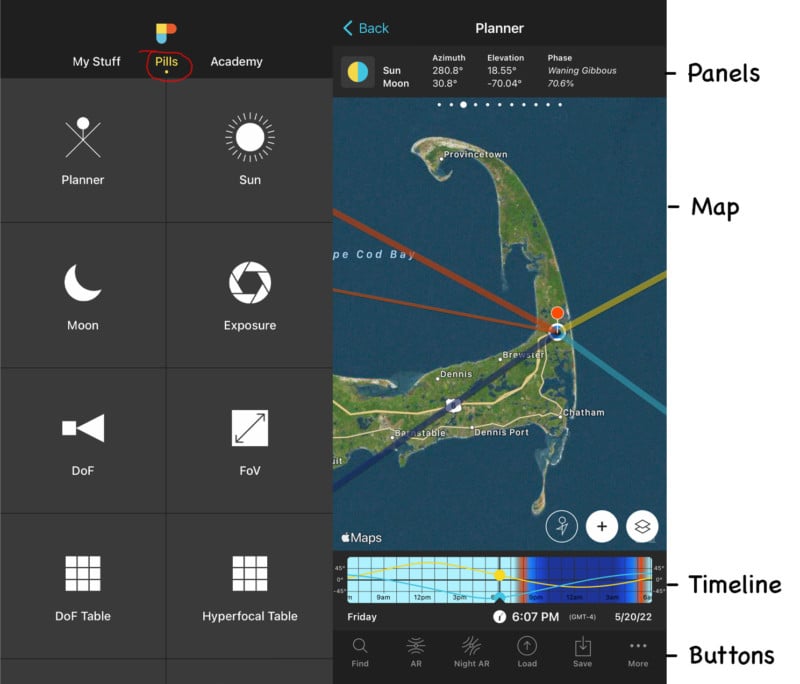
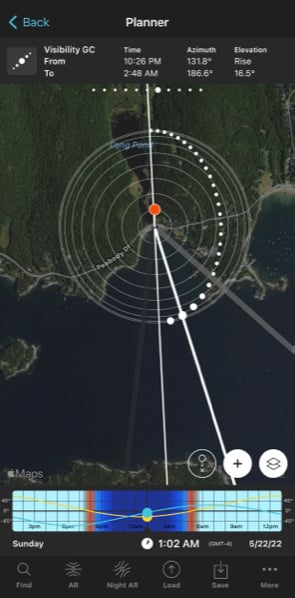
III. The Planner. The Planner is the heart of PhotoPills. The Map, Panels, Timeline, and Buttons have a lot of useful features and information buried inside. This section details what they are and how to use them.
Part One: Getting Started with PhotoPills
I suggest you open up PhotoPills and follow along. Doing is the best way of learning.
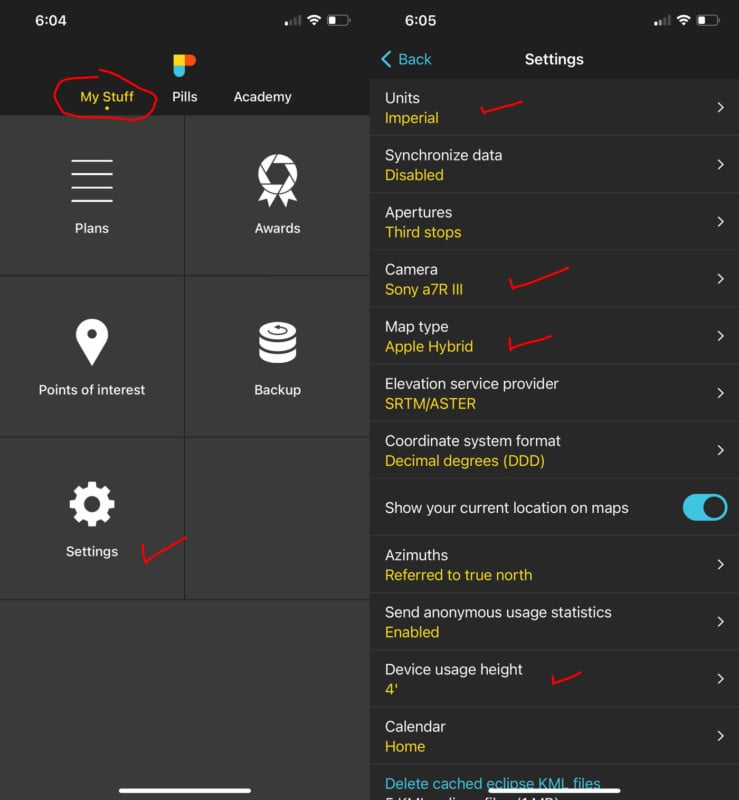
1. When you open PhotoPills you’ll see the PhotoPills logo at the top of the screen and three menu items right below it: My Stuff, Pills, and Academy. Click on “My Stuff” and then “Settings”.
The only things you need to check now in My Stuff are the options for Units, Camera, Map Type ad Device Usage Height.
- Units. Choose either Metric or Imperial. Most of the world uses the metric system. The U.S. uses the imperial system.
- Camera. Select your main camera. You can change this when using some of the other Pills.
- Map type. Pick which map you want to use: Google, Apple, satellite, etc.
- Device height. Enter the typcial height of you’re phone when using it. This helps calibrate the Augmented reality options.
Cycle through the other options under Settings, but there’s no rush. The default settings won’t hurt you.
2. Next, tap the Pills menu button under the PhotoPills logo.
The name PhotoPills comes from the idea that there’s something ailing your photography. Each of the modules under the Pills menu is called a Pill, and the idea is that there’s a pill to cure every problem.
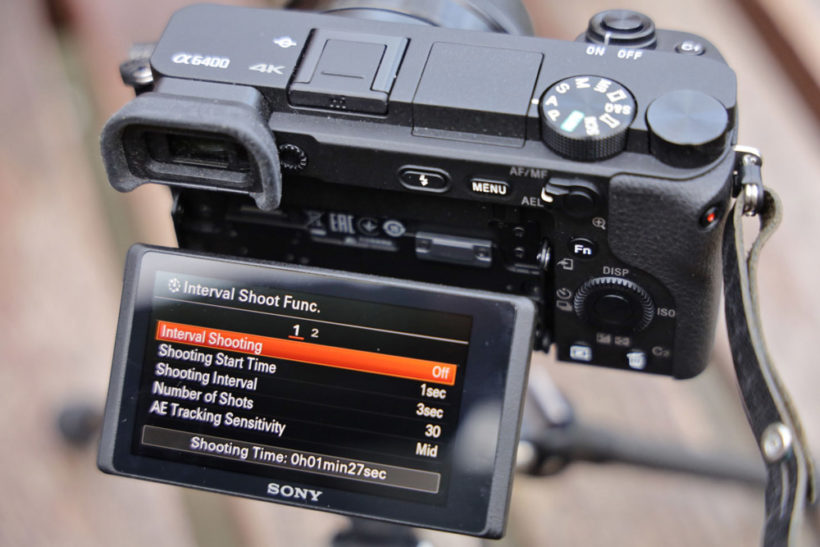
The key Pills are the Planner, Sun, Moon, Exposure, DoF, Meteor Showers, and Star Trails pills. How to use them all is covered in the “How To Plan” section below and in Part Three. Except for the Planner, the Pills are more or less self-explanatory once you open them. The Planner is covered in detail in Part Three.
Part Two: How to Plan Photographs with PhotoPills
Each of the plans below shows you how to create a plan to photograph the Sun, Moon, Milky Way, star trails, and meteor showers. For each of those events, you need to know where and when it will happen and if you’ll be able to make a good photograph from your chosen location. For Milky Way and meteor images, you also need to know whether moonlight will affect their visibility.
PhotoPills makes it easy to get the information you need, bear in mind that many of the Pills duplicate information found in other Pills, so there is more than one way to do things. These plans are just one way. If you’re just starting out, they’ll guide you through the steps to plan your shot. Once you get the hang of it you’ll probably figure out your own approach. If you’re experienced, you might pick up something new.
Also, weather is a key issue with any night-sky photography. Unfortunately, PhotoPills doesn’t include weather information. There are many great weather apps. I use Clear Outside, Astropheric, Weather & Radar, and Dark Sky most often to help plan night shoots. The plans assume weather conditions are good. Obviously, you have to check for yourself.
How to Find the Milky Way Tonight (or Any Night)
1. Open up PhotoPills and tap “Pills” at the top of the screen beneath the PhotoPills logo.
2. Tap the “Moon” Pills. This shows you moon and Sun rise/set times, moon phase, and when the Milky Way’s galactic center will be visible. If it’s a new moon (no moon) or crescent moon, you’re good to go. Avoid nights with a full or half moon because the sky will probably be too bright to see the Milky Way. There are a couple of exceptions, however. Check the moon’s rise and set times. If half or full moon rises well after the galactic center or sets before the galactic center rise, you’re still good to go. Read More...